INTRODUCTION
In this article I will show you to use various aspects of webparts in ASP.net. Using webparts you can provide user with the option to drag and drop objects, changing the CSS at runtime.
EXAMPLE
There are 2 basic things in Webparts:-
1. WebPartManager
2. Webparts Zone
WebPartManager
All Webparts is managed under WebPartManager. You are required to use WebPartManager where ever you are using Webparts in your project. Webparts will not work without WebPartManager.
Webparts Zone
There are 4 kind of zone in web part that is required to build a web part. The 4 zones are:
1. WebPartZone
2. EditorZone
3. CatalogZone
4. ConnectionZone
To use different zones add a dropdown list to your webform and add the following items to it.
• Browse
• Design
• Edit
• Catalog
• Connect
You need to write the code on the selectedIndexChange event of dropdownlist.
protected void DropDownList1_SelectedIndexChanged(object sender, EventArgs e)
{
if (DropDownList1.SelectedItem.Text == “Select”)
{
WebPartManager1.DisplayMode = WebPartManager.BrowseDisplayMode;
}
else if (DropDownList1.SelectedItem.Text == “Design”)
{
WebPartManager1.DisplayMode = WebPartManager.DesignDisplayMode;
}
else if (DropDownList1.SelectedItem.Text == “Browse”)
{
WebPartManager1.DisplayMode = WebPartManager.BrowseDisplayMode;
}
else if (DropDownList1.SelectedItem.Text == “Catalog”)
{
WebPartManager1.DisplayMode = WebPartManager.CatalogDisplayMode;
}
else if (DropDownList1.SelectedItem.Text == “Edit”)
{
WebPartManager1.DisplayMode = WebPartManager.EditDisplayMode;
}
else if (DropDownList1.SelectedItem.Text == “Connect”)
{
WebPartManager1.DisplayMode = WebPartManager.ConnectDisplayMode;
}
}
BROWSE MODE
First we will look at the browse mode. It is the default mode in your webpart. No actions such as drag and drop, changing CSS etc can be performed using browse mode. In case of browse mode only 2 options are seen i.e. minimize and close. Using minimize options you can minimize the webpart and using close option you can close the webpart which can only be restored while being in catalog mode which we will discuss later in this article. Below is the screenshot of sample webpart displayed below.
DESIGN MODE
In design mode we can drag drop objects from one webpart zone to another webpart zone. For that purpose select Design from the dropdown menu and then drag the object from one zone to another zone. In the below screenshots we are dragging control from “Display name “webpart zone to “Enter name” webpart zone.
EDIT MODE
In this mode we can edit the webpart at runtime. We can perform various actions such as changing the size, color etc of the textbox. Edit mode is further divided in to 4 parts. They are Appearance, behavior, Property and layout. We will first look at the Appearance and Layout part.
First, place an editor zone into the web form. Then place an AppearanceEditorPart and LayoutEditorPart inside the editor zone. Run the application and select the “Edit” mode from the dropdown list.
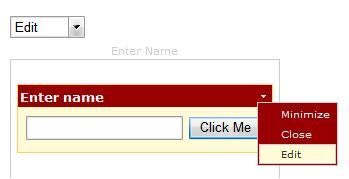
On selecting the Edit mode from the dropdown menu, the webpart will appear with one more option of Edit. Click edit from the menu available for webparts.
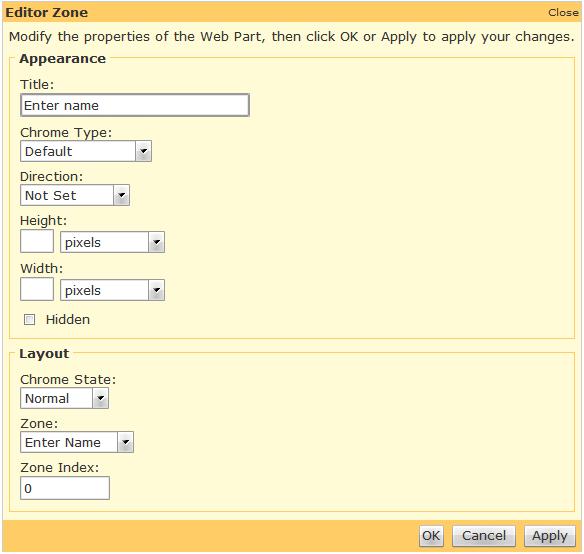
On selecting Edit mode you will get the below output.
You can perform various actions such as changing the title name, specifying the chrome type, changing the width and height of the control etc.
For e.g. if you want to change the title name just specify the title name and then click on the ok button provided below. On clicking the ok button changes will be reflected.
The below is the screenshot.
Now, suppose if you want to change the property of the object in webpart such as changing the CSS of the object in a webpart. This can be achieved using PropertyGridEditorPart.
For that purpose create a user control with textbox and button and place that user control inside the webpart zone.
In this case we will change the CSS class of textbox and button. For that create one css class and give the reference of that css class in your page.
The below is the CSS class.
.textbox_1
{
background-color:White;
color:Blue;
border:solid 2px blue;
}.button_1
{
background-color:White;
color:Blue;
border:solid 2px blue;
}.textbox_2
{
background-color:White;
color:Black;
border:solid 2px black;
}.button_2
{
background-color:White;
color:Black;
border:solid 2px black;
}
In the code behind of the user control write the following code.
string _cssClasstextbox = string.Empty;
string _cssClassbutton = string.Empty;
[WebBrowsable(), Personalizable(true)]
public string CssClassTextbox
{
get { return _cssClasstextbox; }
set { txtname.CssClass = value;}
}
[WebBrowsable(), Personalizable(true)]
public string CssClassButton
{
get { return _cssClassbutton; }
set { btnclick.CssClass = value;}
}
protected void Page_Load(object sender, EventArgs e)
{
txtname.CssClass = CssClassTextbox;
btnclick.CssClass = CssClassButton;
}
The above code changes the CssClass of the TextBox and button. This property will now be available in the webparts edit mode and we will be able to change this at run-time as well. Besides setting the CssClass we have also used two additional attributes in the class declaration:
- WebBrowsable – It allows a webpart to display a user defined property in edit mode.
- Personalizable – It allows a property to be editable.
Now run this page. If we choose the edit mode from the webpart menu, we will see the following edit button in options menu of the webpart. The screenshot below illustrates this.
On selecting edit mode from the option, we will have the CSS property in the edit mode. The below is the screenshot.
Currently Textbox and button is using the default Css property. Now we will apply the new CSS class from the stylesheet for e. g textbox_2 and button_2 and click on the ok button.
The style of the textbox and button will get change as shown below.
CATALOG MODE
The catalog zone gives us the option to add/remove, hide/show the webparts at runtime. For example say there are few webparts on Webform such as webpart showing weather condition, time, daily horoscope etc. Now if the user wants to remove or hide the webpart at runtime, then it can be accomplished using catalog mode.
To use catalog mode you need to catalog zone. The catalog zone is further divided in to three parts. They are PageCatalogPart, DeclarativeCatalogPart and ImportCatalogPart.
On the Webform add one catalog zone and add all the above catalog part in to it.
Page catalog
Suppose if you want to remove Enter name webpart from the page at runtime. You can do it by just by selecting close option from the webpart options.
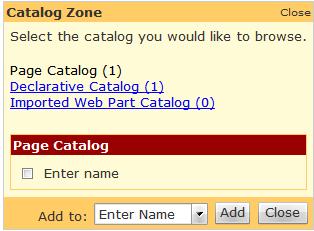
Now you want the same webpart to appear in your page again. To do that select catalog options from the dropdown list. You will see the catalog zone with the all the above three parts as shown below.
You can see in the above screen shot that Enter Name webpart appears in the Page Catalog zone. Select the Enter Name webpart and select the zone from the dropdown list to which you want to add the selected webpart.
The selected webpart will be added to the respective zone which you have selected.
Imported Web part catalog
Suppose user want to add new external webpart. He can do that by importing webpart. We can import files with the extension .webpart. To export a file as a .webpart type, add the following line to your web.config inside the <system.web> tag.
<webParts enableExport=”true“></webParts>
To import webpart, click on the “Imported web part catalog” link in catalog zone. It will display the fileupload control from where you can upload the file. Once the file is uploaded it will below fileupload control. Select the webpart and select the zone from the dropdown list to which you want to add the webpart. The below is the screenshot.
Selected webpart get added to your webpart zone.
CONNECT MODE
Connect mode allows webpart to connect with each other. We can make static connections through code or we can make connections at runtime according to the requirement. Here webpart is not connecting to database. Instead it is connecting to another webpart.
In our example we will create 2 controls b y name “name.ascx” and “Displayname.ascx”. One is for passing the text and another is for receiving the text.
Add a new class in the App_Code directory and name it ITextProvider. Add the following code to it.
public class ITextProvider
{
public interface ITextToPass
{
string GetText();
}
}
We are going to use this interface in both user controls to pass text between these two entities.
Add one textbox and a button in the name.ascx control. Add the below code in “name.ascx” page just above the page load.
[ConnectionProvider(“TextToPass”, “TextProvider”)]
public ITextProvider.ITextToPass GetTextTransferInterface()
{
return ((ITextProvider.ITextToPass)(this));
}public string GetText()
{
return txtname.Text;
}
Add one label in another control in “Displayname.ascx”. Add the below code in “Disaplayname.ascx” page just above the page load.
[ConnectionConsumer(“Text”, “TextConsumer”)]
public void GetTextTransferInterface(ITextProvider.ITextToPass provider)
{
lblName.Text = provider.GetText();
}
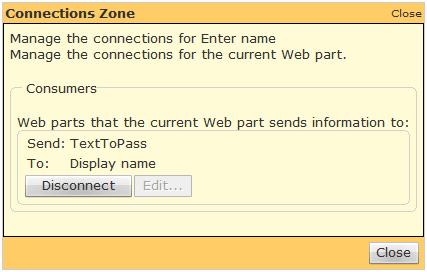
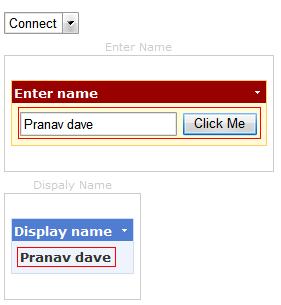
Run the example. Select connect mode from the dropdown list. Then select connect option from the webpart, connection zone appears. Then click on the Create a connection to a Consumer link in the connection zone as shown below.
On clicking the hyperlink it will display the below screen.
Select the webpart as a consumer from the dropdown list and click on the connect button.
Once the connection is established you can test the connect mode. Enter any text in name webpart and click on the button. It will display the entered string in another webpart as shown below.
SAVING PAGE STATE IN DATABASE
Suppose there are multiple users accessing your application and you need to save page setting for each users. In that case you need a store the users setting in database.
In this case we will create a database to store users setting. We are going to use the default asp.net database called ASPNETDB.mdf which is automatically created in applications app_data folder. This database already has the appropriate schema to save the page state for every user.
To create the default database for webparts you need to run the utilitynamed as aspnet_regsql.exe which is located in the C:\Windows\Microsoft.NET\Framework\v2.0.50727. This utility helps us to create tables and stored procedures required to customize database. The below is the screenshots.
Just follow the wizard to create the default database. It will create the following tables in database.
That’s it.
To download the source code click here.








Just want to say what a great blog you got here!
I’ve been around for quite a lot of time, but finally decided to show my appreciation of your work!
Thumbs up, and keep it going!
Cheers
Christian, Satellite Direct Tv
Your Explanation is so nice.
Thanks for providing this.
Great share 🙂
Good day I was fortunate to search your subject in baidu
your subject is quality
I obtain a lot in your topic really thank your very much
btw the theme of you site is really splendid
where can find it
Good noon.
There’re a lot in your topic. The first website Google has searched out after three weeks of search.
May Heaven bless you much.
Still little more clarifications are needed in database connections for the webparts stores for many users.
MERRY CHRISTMAS.